August 29, 2025
The purpose of this article is to assist AICC members with resolving an internal or customer-generated thermoformed blister card sealing issue.
The first information to obtain is what blister coating is being used and the type of blister material—usually polyvinyl chloride (PVC) or a version of recycled polyethylene terephthalate (RPET). You can determine if the blister is PVC or RPET material by several simple tests. You can crease a PVC blister, and it will turn white at the crease; you can burn it, and it will smoke and char badly. The PET or RPET material will not char, and it will turn white in the heated area. It will also drip. Blister gauge should be at 0.0075″ min to 0.03″ max thickness before thermoforming. Flange width should be 0.312″ minimum.
If there is still a question regarding the type of blister coating, put a few drops of ammonia on the blister coating, let it remain there for five or 10 minutes, and then wipe it off. If it eats into the coating, the coating is an aqueous coating; if it does not destroy the coating, it is solvent-based.
Your investigation should begin with the sealing process: the sealing trilogy of time, temperature, and pressure. The one element that must be maintained in the sealing of a blister card is the interface temperature. Blister coatings are designed to be reactivated at specific temperatures. Most solvent-based coatings will reactivate at 180°–190°F, and the aqueous versions will reactivate at 190°–205°F.
This reactivation of the coating creates a hot, sticky mass known as “hot tack”; this hot mass sticks to the plastic blister, and as the coating cools, the blister and card bond.
If too much heat is applied or the dwell time is excessive, the blister coating viscosity will be reduced, and the coating will penetrate into the card, leaving an insufficient coating on the card surface to adhere to the blister. Of course, the dwell time must be long enough to reactivate the coating.
The heat tapes that you should obtain are to be used to determine the interface temperature. The heat tape is removed from the sheet, and with the card facing up, it is placed in the flange area. It will not register a reading if not placed in the flange area.
The card is then turned over and placed in the tray face down. The sealing process commences. The last square on the tape that turns black determines the interface temperature. Occasionally, the placement of the tapes will not be in line with the flange area; therefore, you will not get a reading. The tape must have pressure on it to work.
The next step is to take your pyrometer and check the heat platen. Usually, the temperature on the machine reading indicator varies from the true reading of the heat platen. Also, check the platen in different areas; the platen could have a burned element, thereby causing a fluctuation in sealing around the flange area. If the situation would allow, the heat platen could be taken off the sealing machine, laid on a flat surface, and checked for warping with a straight edge placed diagonally on the platen.
Look at the unsealed area of the blister flange that is not sealing; if it is “glossy” like the unsealed areas of the entire card, you can assume no pressure or heat is being applied in the flange area. If the configuration of the blister would allow it, turn a new blister around in the tray and see if it fails in the same area. If the failure moves to a different area, it could be a blister problem. Also note how many cavities are being sealed at one time. Now is the time to check the platen pressure with your pressure film.
Say you’re measuring heat platen pressure using two pieces of pressure film: Both have a glossy and dull side; one piece is opaque and the other, translucent. To register a reading, the two pieces of film must be placed dull side to dull side.
The card is then placed face down over the two pieces of pressure film. The sealing machine is put in motion. The translucent top piece of pressure film usually sticks to the face of the card, and resulting pressure shows up on the bottom opaque piece. A minimum pressure of 80 psi is required in the face seal area.
Any light-colored areas on the opaque piece indicate a lack of heat platen pressure on that area of the card. Incidentally, wooden trays are noted for this problem because they warp badly with the fluctuation of relative humidity in the atmosphere. If the problem is on a carousel sealing machine, check the rails and tray fixtures for the degree of vertical fluctuation.
Heat platens can either be milled tooling or flathead platens. The milled tooling does not put as much heat into the blister card as a flathead platen. Flathead platens without a Teflon cover can easily burn the back of a blister card. The rubber or cork used on trays should be checked for damage and compression caused by too much platen pressure. The rubber on the seal tray surface should range from 50 to 90 durometer.
Keep in mind that the thickness of the blister card can have a bearing on heat transmission through the back of the card. Significantly aged (over 90 days old) blister cards have a tendency to dry out. Therefore, temperatures and dwell times will have to be increased to attain a successful seal.
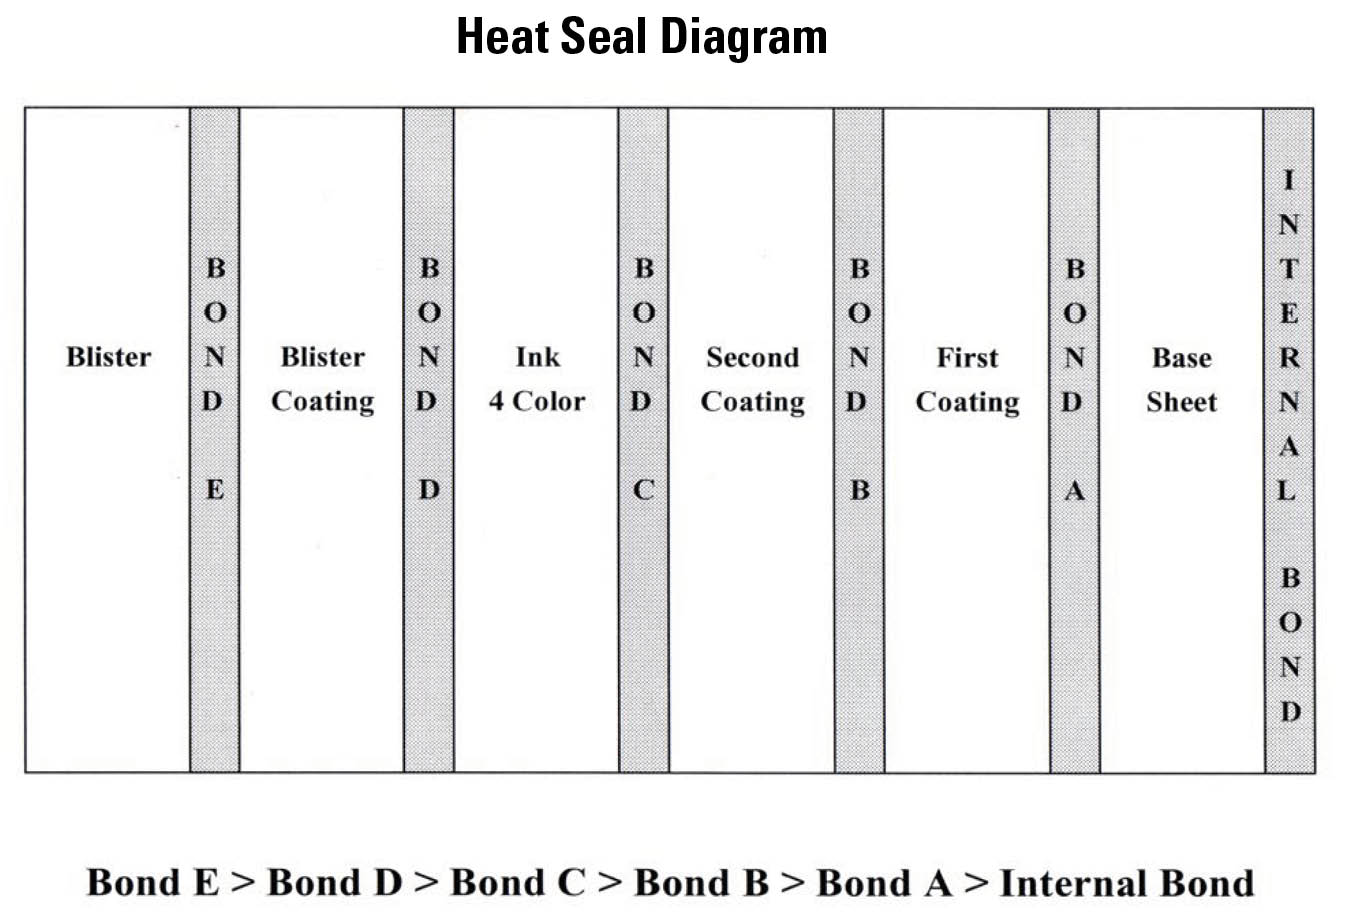
The board we use is known as blister board low-density board, which means it has a “fluffy” surface so the blister coating can easily bind with the surface layer of clay coating, whereas carton board has a harder and more calendered, smoother finish. See the diagram (above right) and note the various interfaces of a sealed blister card.
The weakest interface and the one that should fail is Bond A to the base sheet; the fracture at this juncture results in fiber tea (successful seal). A failure at any other juncture would be considered a failed seal—and we would initially be held responsible—but if the bond between Bond A and the base sheet would be too strong, it would be a board problem. The split between Bond B and Bond A (clay split) is often a result of this situation. With clay split, you will have white coating on the blister flange, but there will be no board fiber attached.
This is why I would suggest you perform your own lab tests on all incoming board before the board goes into production.
One of the most prevalent sealing problems today is the sealing of RPET blisters (oriented). The plastics and the quantities used in the film vary greatly; therefore, film properties change from batch to batch. In addition, the heat history of the film the thermoformer receives has a significant bearing on the thermoforming process.
When the thermoformer processes PVC film, it can use temperatures high enough to reach the glass transition point: Once past this point, the film reaches the optimum forming temperature—the film can be stretched and formed without creating orientation or stress.
When processing RPET film, the thermoformer cannot achieve the optimum forming temperature because the film surface will become crystallized and will not seal. Therefore, the film is processed at a lower temperature. The result is a formed blister that contains stress, a cold-formed blister. Memory remains in the film; during the sealing process when heat is applied, the blister flange softens, and the stressed film tries to return to its original shape.
As a result of this stress, the blister flange will ripple and pull away the card, it will pick off ink from the inside of the blister wall, and the flange will curl back up toward the vertical blister wall.
When dealing with RPET blisters and a sealing problem, you can save time and effort if you have two pieces of polarized film. By placing the blister between the two pieces of film, one piece at held at a 45-degree angle, you will immediately see the stress areas in the blister. The stress will show up as colored rings. The more purple rings that show, the more stress is present in the blister. Check the flange area, in particular. This method, in many cases, will direct you to the source of the problem immediately. It also gives you something definite you can show a customer. The technical term for the purple rings is birefringence.
A few other points to consider in troubleshooting a sealing problem are the number of cavities on a sealing tray and the shape of the blister. Long, narrow flanges can create sealing problems, and thin, narrow flanges will also ripple if too much heat is applied.
If the above methods fail to solve the problem, please gather all of the information with associated samples and send to my attention for our collective further review and investigation.

Tom Weber is president of WeberSource LLC and is AICC’s folding carton and rigid box technical advisor. Contact Tom directly at asktom@AICCbox.org.